训练目标追踪功能模型
手动控制逻辑代码
“python/src/scenes/manual.py”为手动控制小车的核心部分。
-
首先导入所有必须模块和基础运动模块。
import datetimeimport osimport cv2import numpy as npfrom src.actions import Advance, Stop, SetServo, TurnLeft, TurnRight, SpinClockwise, SpinAntiClockwise, BackUp, \ShiftLeft, ShiftRight, CustomActionfrom src.actions.complex_actions import ComplexAction, TurnAroundfrom src.scenes.base_scene import BaseScenefrom src.utils import log -
基于场景的基类构建手动控制小车场景的手动类,初始化后,进入到loop循环的函数中,不断等待键盘输入的键值,再执行键值对应的指令
def loop(self):ret = self.init_state() # 执行初始化if ret:log.error(f'{self.__class__.__name__} init failed.')returnframe = np.ndarray((self.height, self.width, 3), dtype=np.uint8, buffer=self.broadcaster.buf) # 拉取共享内存中的图片log.info(f'{self.__class__.__name__} loop start')last_action = SetServo(servo=[90, 65]) # 设置舵机角度while True:try:if not self.msg_queue.empty():key = self.msg_queue.get()else:continueexcept KeyboardInterrupt:self.ctrl.execute(Stop()) #捕获SIGINT之后停止小车breakdegree = 0if key == 'up':self.speed = min(self.speed + 1, 60) #加速elif key == 'down':self.speed = max(self.speed - 1, 25) #减速elif key == 'left':last_action = ShiftLeft() #左平移elif key == 'right':last_action = ShiftRight() #右平移elif key == 'w':last_action = Advance() #前进elif key == 'a':last_action = TurnLeft() #左转degree = 1.1elif key == 's':last_action = BackUp() #后退elif key == 'd':last_action = TurnRight() #右转degree = 1.1elif key == 'q':last_action = SpinAntiClockwise() #逆时针旋转elif key == 'e':last_action = SpinClockwise() #顺时针旋转elif key == 'space':last_action = Stop() #停车elif key == 'esc':self.ctrl.execute(Stop()) #退出循环前停下小车breakelif key == 'c':save_img = frame.copy()cv2.imwrite(os.path.join(self.save_dir, f'{datetime.datetime.now()}.jpg'), save_img) #保存当前摄像头中的画面log.info(f'image saved.')elif key == 't':last_action = CustomAction(motor_setting=[-62, 50, 50, -50])elif key == 'r':last_action = CustomAction(motor_setting=[55, -50, -50, 50])elif key == 'z':last_action = TurnAround() #掉头else:continueif not isinstance(last_action, ComplexAction) and not isinstance(last_action, CustomAction):last_action.update_speed = Falselast_action.speed_setting = last_action.generate_speed_setting(speed=self.speed, degree=degree)last_action.fix_speed()self.ctrl.execute(last_action)
父主题: 代码实现
目标检测模型代码
“python/src/models/yolov5.py”为yolov5模型的定义代码,为小车的基础运行提供核心的智能目标识别与检测功能。
-
示例代码定义了如何重塑图片的尺寸,并计算需要零值填充大小的功能。
def letterbox(img, new_shape=(640, 640), color=(114, 114, 114), auto=False, scaleFill=False, scaleup=True):# Resize image to a 32-pixel-multiple rectangle https://github.com/ultralytics/yolov3/issues/232shape = img.shape[:2] # current shape [height, width]if isinstance(new_shape, int):new_shape = (new_shape, new_shape)# Scale ratio (new / old)r = min(new_shape[0] / shape[0], new_shape[1] / shape[1])if not scaleup: # only scale down, do not scale up (for better test mAP)r = min(r, 1.0)# Compute paddingratio = r, r # width, height ratiosnew_unpad = int(round(shape[1] * r)), int(round(shape[0] * r))dw, dh = new_shape[1] - new_unpad[0], new_shape[0] - new_unpad[1] # wh paddingif auto: # minimum rectangledw, dh = np.mod(dw, 64), np.mod(dh, 64) # wh paddingelif scaleFill: # stretchdw, dh = 0.0, 0.0new_unpad = (new_shape[1], new_shape[0])ratio = new_shape[1] / shape[1], new_shape[0] / shape[0] # width, height ratiosdw /= 2 # divide padding into 2 sidesdh /= 2if shape[::-1] != new_unpad: # resizeimg = cv2.resize(img, new_unpad, interpolation=cv2.INTER_LINEAR)top, bottom = int(round(dh - 0.1)), int(round(dh + 0.1))left, right = int(round(dw - 0.1)), int(round(dw + 0.1))img = cv2.copyMakeBorder(img, top, bottom, left, right, cv2.BORDER_CONSTANT, value=color) # add borderreturn img, ratio, (dw, dh) -
Yolov5的模型定义,以及推理的实现过程,形成最终的推理结果目标框和对应的类别名称。
class YoloV5(Model):def __init__(self, model_path, acl_init=True):super().__init__(model_path, acl_init)self.neth = 640self.netw = 640self.conf_threshold = 0.1dic = {0: 'left',1: 'right',2: 'stop',3: 'turnaround'}self.names = ['person', 'sports_ball', 'bicycle', 'motorcycle', 'car', 'bus', 'truck'] * 12self.object_list = ['person', 'sports_ball', 'bicycle', 'motorcycle', 'car', 'bus', 'truck']self.names = list(dic.values())self.object_list = list(dic.values())def infer(self, img_bgr):imgh, imgw = img_bgr.shape[0], img_bgr.shape[1]imginfo = np.array([self.neth, self.netw, imgh, imgw], dtype=np.float16)img_padding = letterbox(img_bgr, new_shape=(self.neth, self.netw))[0] # padding resize bgrimg = []img.append(img_padding)img = np.stack(img, axis=0)img = img[..., ::-1].transpose(0, 3, 1, 2) # BGR tp RGBimage_np = np.array(img, dtype=np.float32)image_np_expanded = image_np / 255.0img = np.ascontiguousarray(image_np_expanded).astype(np.float16) #将tensor的内存连续排列result = self.execute([img, imginfo]) #调用推理接口batch_boxout, boxnum = resultpred_boxes = []idx = 0num_det = int(boxnum[idx][0])bbox = batch_boxout[idx][:num_det * 6].reshape(6, -1).transpose().astype(np.float32) # 6xN -> Nx6for idx, class_id in enumerate(bbox[:, 5]):obj_name = self.names[int(bbox[idx][5])]if not obj_name in self.object_list:continueconfidence = bbox[idx][4]if float(confidence) < self.conf_threshold:continuex1 = int(bbox[idx][0])y1 = int(bbox[idx][1])x2 = int(bbox[idx][2])y2 = int(bbox[idx][3])pred_boxes.append([x1, y1, x2, y2, obj_name, confidence]) #获取推理结果return pred_boxes
父主题: 代码实现
目标追踪逻辑代码
在实现目标检测的前提下,结合小车的基础控制部分,将小车的速度调整依赖到目标检测的推理结果上,就能实现目标追踪。
-
“python/src/scenes/tracking.py”为目标追踪的核心代码,示例代码定义追踪的运行逻辑。
class Tracking(BaseScene):def __init__(self, memory_name, camera_info, msg_queue):super().__init__(memory_name, camera_info, msg_queue)self.model = Nonedef init_state(self):log.info(f'start init {self.__class__.__name__}')model_path = os.path.join(os.getcwd(), 'weights', 'tracking.om')if not os.path.exists(model_path):log.error(f'Cannot find the offline inference model(.om) file needed for {self.__class__.__name__} scene.')return Trueself.model = YoloV5(model_path) #加载模型log.info(f'{self.__class__.__name__} model init succ.')self.ctrl.execute(SetServo(servo=[90, 65])) #设置舵机角度return Falsedef loop(self):ret = self.init_state() #执行初始化if ret:log.error(f'{self.__class__.__name__} init failed.')returnframe = np.ndarray((self.height, self.width, 3), dtype=np.uint8, buffer=self.broadcaster.buf) #获取共享内存中的图片log.info(f'{self.__class__.__name__} loop start')last_action = Nonelast_not_seen = Trueforward_speed_slow = 30forward_speed_fast = 40while True:action = Noneif self.stop_sign.value:breakif self.pause_sign.value:continueimg_bgr = frame.copy()bboxes = self.model.infer(img_bgr)log.info(f'{bboxes}')if not bboxes:if last_not_seen:action = Stop()else:last_not_seen = Truecontinueelse:if len(bboxes) > 1:ori_box = sorted(bboxes, key=lambda x: x[-1], reverse=True)[0][:4]else:ori_box = bboxes[0][:4]x1, y1, x2, y2 = ori_boxx, y = (x1 + x2) // 2, (y1 + y2) // 2 #计算目标中心点的x与y坐标h, w = y2 - y1, x2 - x1 #计算目标的宽高if h * w < 141 * 128 or y < 110: #进行距离判断,如果过远就加速,否则减速speed = forward_speed_fastelse:speed = forward_speed_slowif x < 400:action = TurnLeft(degree=1.1, speed=speed) #左转elif x > 1000:action = TurnRight(degree=1.1, speed=speed) #右转else:action = Advance(speed=speed) #直行if h * w > 800 * 500 or y > 390: #如果距离过近则停车action = Stop()if action is None or action == last_action:continueself.ctrl.execute(action)last_action = action -
初始化并导入Yolov5目标检测模型。
def __init__(self, memory_name, camera_info, msg_queue):super().__init__(memory_name, camera_info, msg_queue)self.model = Nonedef init_state(self):log.info(f'start init {self.__class__.__name__}')model_path = os.path.join(os.getcwd(), 'weights', 'tracking.om')if not os.path.exists(model_path):log.error(f'Cannot find the offline inference model(.om) file needed for {self.__class__.__name__} scene.')return Trueself.model = YoloV5(model_path)log.info(f'{self.__class__.__name__} model init succ.')self.ctrl.execute(SetServo(servo=[90, 65]))return False -
在得到正确导入结果后,开启循环,不断获取推理结果,并根据结果估算智能小车和追踪目标之间的距离,再根据计算出的结果下达不同的运动指令,设置慢速和快速跟进的两个速度。
def loop(self):ret = self.init_state()if ret:log.error(f'{self.__class__.__name__} init failed.')returnframe = np.ndarray((self.height, self.width, 3), dtype=np.uint8, buffer=self.broadcaster.buf)log.info(f'{self.__class__.__name__} loop start')last_action = Nonelast_not_seen = Trueforward_speed_slow = 30forward_speed_fast = 40 -
获取推理结果的外接框。
bboxes = self.model.infer(img_bgr) -
计算出目标框的中心点的位置和目标框的宽高大小。
log.info(f'{bboxes}')if not bboxes:if last_not_seen:action = Stop()else:last_not_seen = Truecontinueelse:if len(bboxes) > 1:ori_box = sorted(bboxes, key=lambda x: x[-1], reverse=True)[0][:4]else:ori_box = bboxes[0][:4]x1, y1, x2, y2 = ori_boxx, y = (x1 + x2) // 2, (y1 + y2) // 2h, w = y2 - y1, x2 - x1根据计算出的目标框的大小来判断小车和目标之间的距离,再调整小车的行进速度。根据目标近大远小的简单规则,存在两个判断条件,如果目标框的面积小于一定值,就说明小车与目标距离较远,需要快速接近目标,另外如果识别框的中心点的纵坐标大于0,也就是在摄像头视角里的上半部分,也说明小车距离目标较远,也需快速接近目标,反之亦然。
if h * w < 141 * 128 or y < 110:speed = forward_speed_fastelse:speed = forward_speed_slow -
另外如果前方目标在小车的偏左或偏右的位置,也可以采用同样的判断方法,即判断目标框的中心点的横坐标落在小车摄像头视角画面中的左侧还是右侧,进而下发对应的微调转向的命令,实现跟踪目标的方向调整。
if x < 400:action = TurnLeft(degree=1.1, speed=speed)elif x > 1000:action = TurnRight(degree=1.1, speed=speed)else:action = Advance(speed=speed)if h * w > 800 * 500 or y > 390:action = Stop()
父主题: 代码实现
训练目标追踪功能模型
当前目标追踪功能,需要单独使用模型适配工具训练(模型适配工具的安装与使用请参见《[使用模型适配工具生成推理应用](https://www.hiascend.com/document/detail/zh/Atlas200IDKA2DeveloperKit/23.0.RC2/Getting Started with Application Development/iaqd/iaqd_0001.html)》),用户可参见本节,进行模型的训练获得对应模型文件。
-
收集待标记的png、jpg、JPEG、bmp、webp格式图片数据,推荐使用jpg格式。图片分辨率不高于1080P,单张图片不小于1MB,推荐使用小车上的摄像头进行图片收集,数量为200张以上且各角度均包含,并放置在全英文路径下。
注:图片名称不要带字符"."。
-
为模型迁移准备数据集,进行图像标注,在模型适配工具界面选择“检测模型”。
-
单击“打开目录”选择1收集的数据集目录进行标注。
-
单击

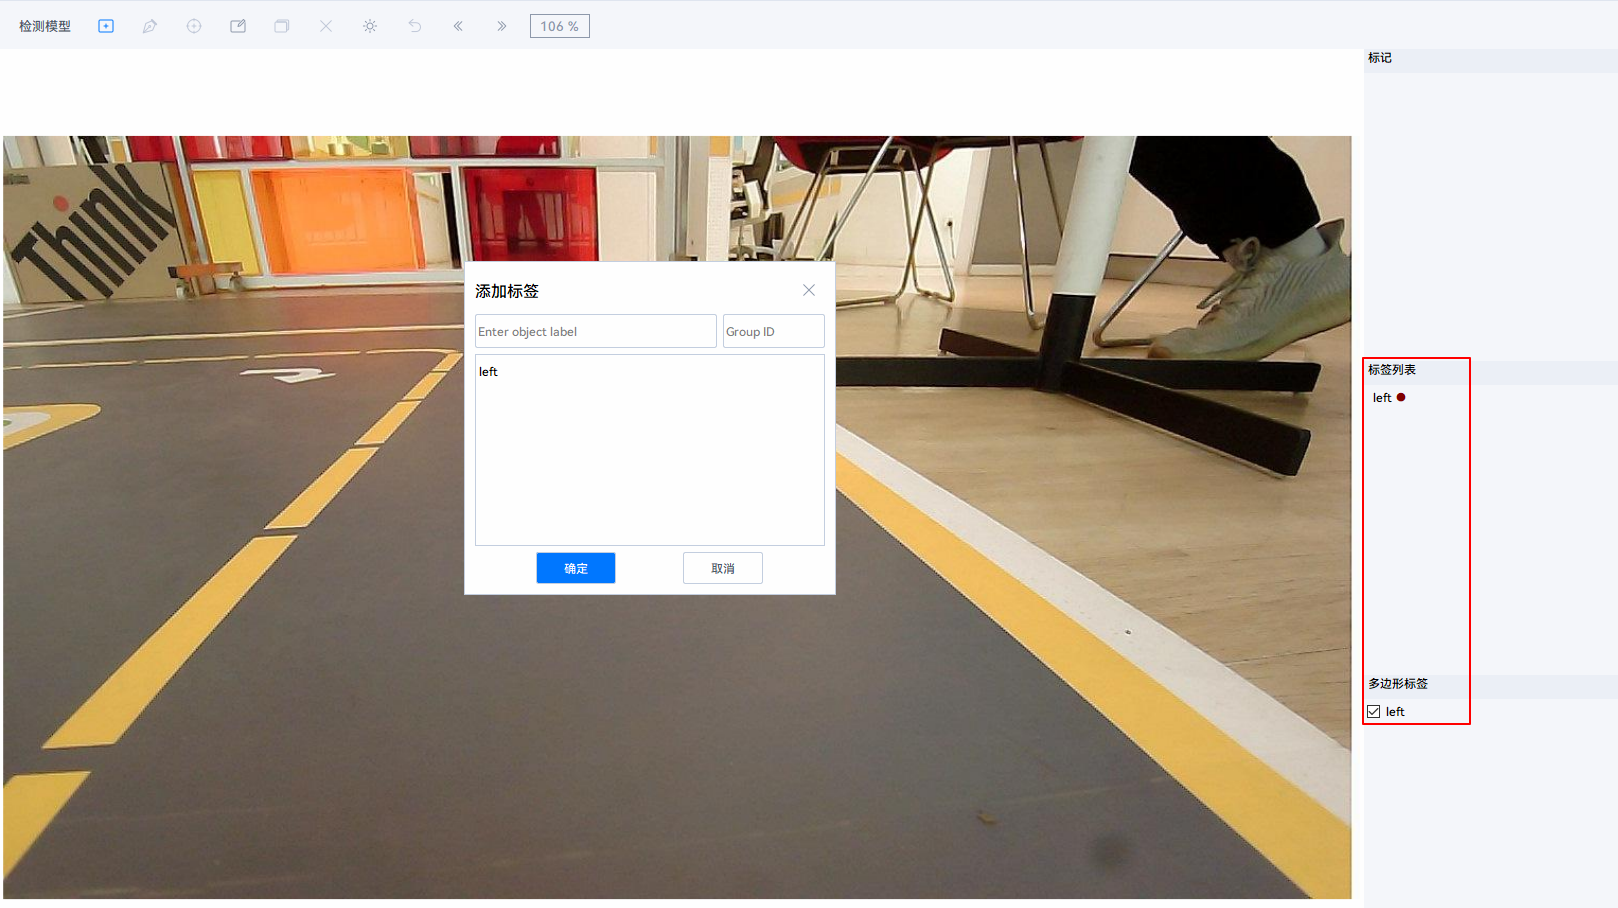
按钮,使用矩形框包围目标后单击鼠标左键,弹出添加标签界面,如图1所示。填写对应目标分类标签与Group ID号,当一个图片中有多个目标时需填写不同的ID号,单击“确定”完成标注。
图1 添加标签
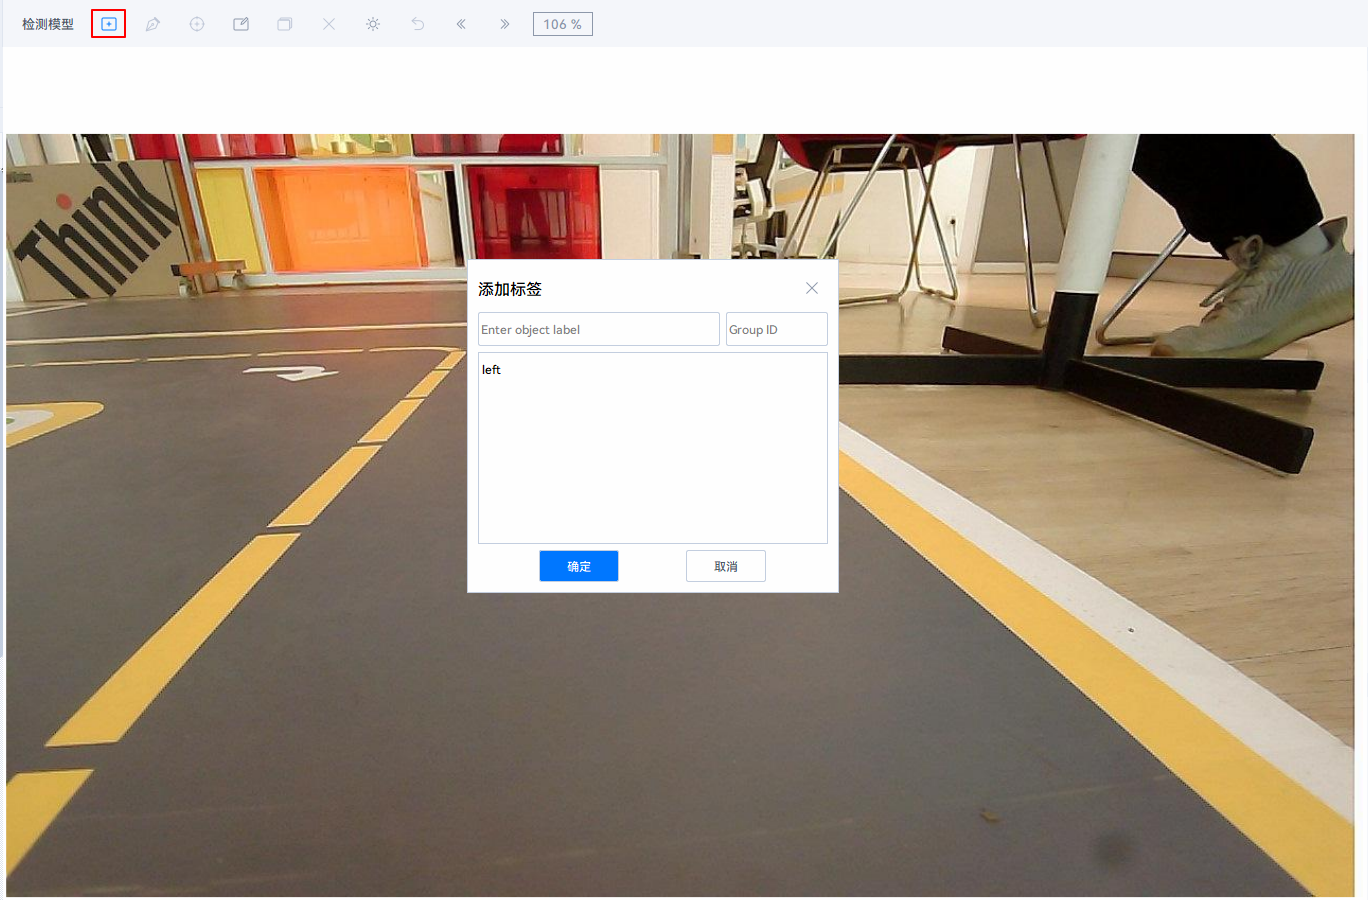
图2 标注结果
-
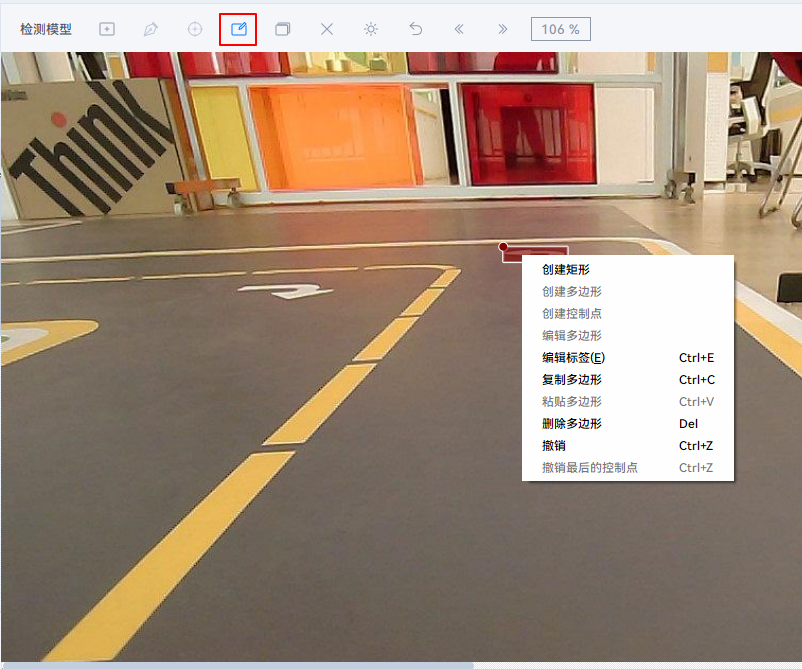
若标记错误可单击

按钮,按住左键可以移动标记框,移动鼠标至矩形框并单击“鼠标右键”,对矩形标签进行修改。
图3 修改标签
-
当前图片标注完成后,单击图片上方菜单栏中

图标或在左侧文件列表选择下一张图片进行标记,直到完成所有图片的标注任务。
:::note 说明
- 标注时输入标签仅支持数字、字母、下划线。
- 数据集图片要从实际模型部署使用的环境获得。
- 需将图片中的所有待检测目标都标注出来,漏标注将影响模型精度。
- 边框需要紧密框住每个目标,且类别正确,标注无误。 :::
-
模型迁移
-
在工具界面单击下方“一键迁移”按钮,进入配置界面,输入迁移信息,单击“一键迁移”开始迁移。
图4 模型一键迁移配置界面
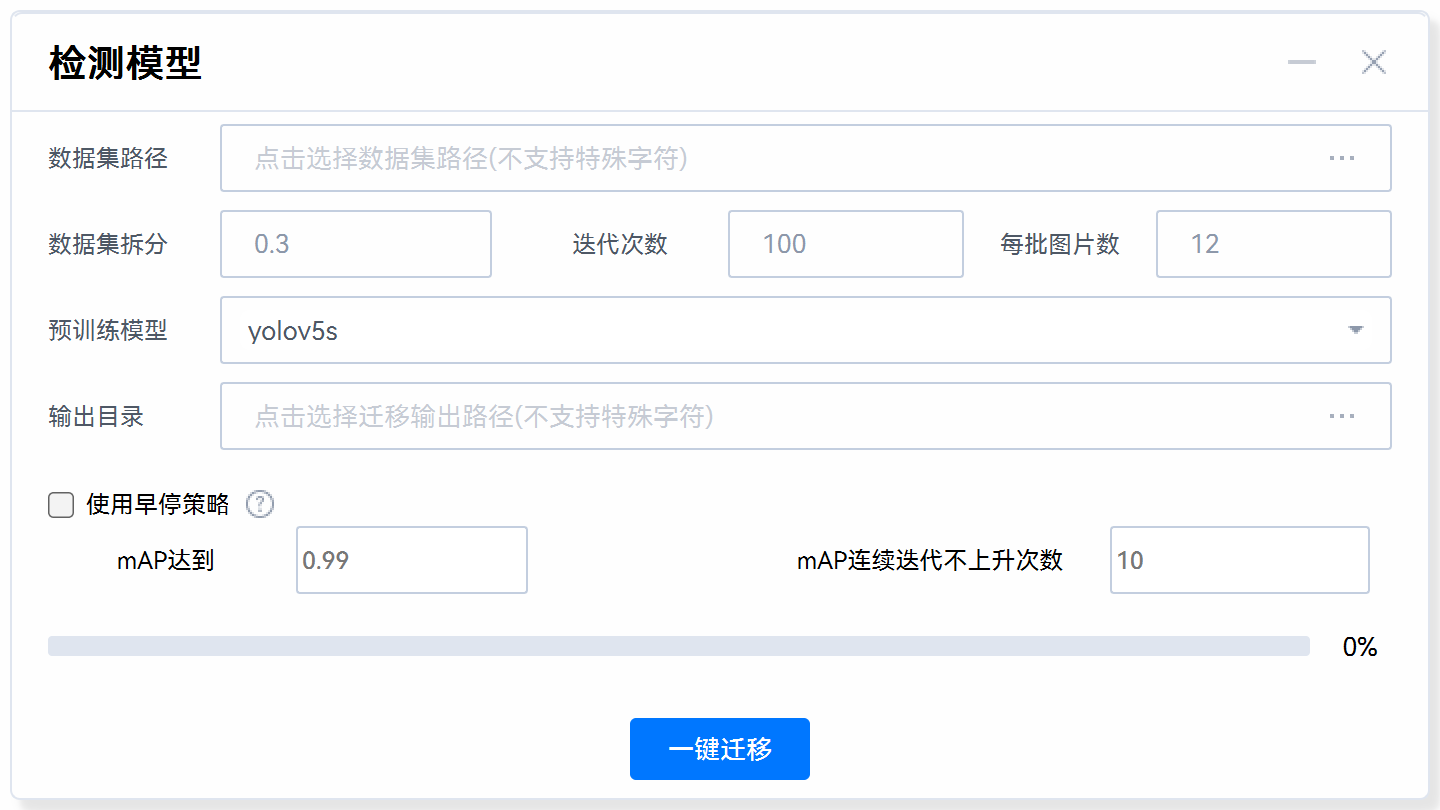
- 数据集路径:2输出的自定义数据集输出路径。
- 数据集拆分:将图片划分成训练、验证以及测试集的比例,推荐值:0.3。默认拆分0.1的测试集用于边缘推理,训练集与验证集按输入拆分比例再次进行拆分。
- 迭代次数:训练轮次,推荐值:100。
- 每批图片数:参与每个批次训练的图片张数,推荐值:12。
- 预训练模型:可选yolov5s,yolov5n,yolov5l,yolov5x,默认yolov5s。
- 输出目录:模型输出路径。
- 使用早停策略:勾选后,可根据设置的mAP值(均值平均精度,一般指图片内所有类别的AP的平均值)和持续迭代不上升次数,提前停止训练。
- mAP达到(值):该训练模型精度已达标,可停止训练的阈值,默认值:0.99。
- mAP连续迭代不上升次数:mAP值达到某一水平,多次迭代后并无提升的次数,默认值:10。
-
迁移完成后会出现提示框,提示已生成打包好的文件,如图5所示。在训练输出目录会生成以下文件与目录,如图6所示。
- train_output:训练输出的权重文件、onnx文件以及训练数据信息json文件。
- trans_output:经过数据转换,根据数据集拆分设置生成的测试集、验证集、训练集。
- infer_project.tar.gz:打包好的推理相关模型文件与脚本。
图5 迁移完成

图6 输出文件

在线提单