接口定义
整机接口定义
LPC3588提供了丰富的接口,具体如下图:
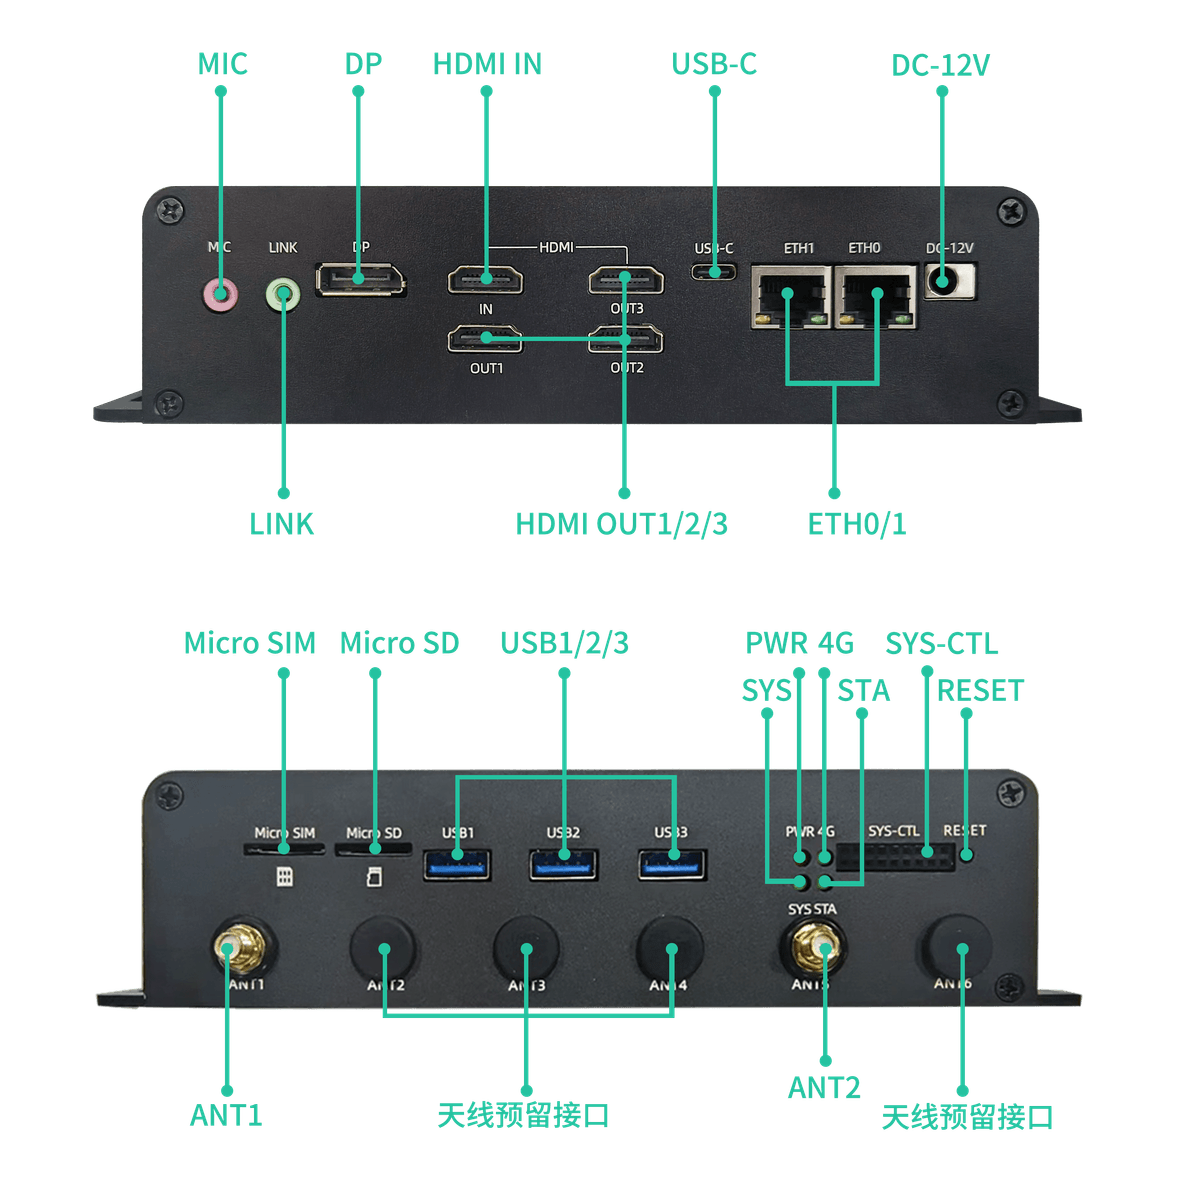
MIC 使用
使用以下命令可以录制音频文件,支持wav、mp3等格式。
录制双声道的16位小端格式的音频,采样率为48000Hz,然后保存为001.wav文件。
- Cmd
- C
- Python
arecord -Dhw:0,0 -r48000 -f S16_LE -c2 > 001.wav
• -Dhw:0,0 指定了录音设备,0,0 是card 0 device 0,也就是第一个声卡的第一个设备。
• -r48000 指定了采样率,单位是Hz,48000表示每秒采样48000次。
• -f S16_LE 指定了采样格式,S16_LE表示有符号的16位小端格式,也就是每个采样点占用2个字节,低位在前,高位在后。
• -c2 指定了声道数,2表示双声道,也就是立体声。
• > 001.wav 指定了输出文件,>表示重定向标准输出到文件,001.wav表示文件名,wav表示文件格式。
create audio_record.c
#include <stdio.h>
#include <stdlib.h>
#include <alsa/asoundlib.h>
#define SAMPLE_RATE 44100 // Replace SAMPLE_RATE with a local variable
#define CHANNELS 2 // Replace CHANNELS with a local variable
int main(int argc, char *argv[]) {
const char *device = "hw:0,0"; // Set the audio device
snd_pcm_t *pcm_handle;
snd_pcm_hw_params_t *params;
unsigned int sample_rate = SAMPLE_RATE; // Use a modifiable local variable
int channels = CHANNELS; // Use a modifiable local variable
int pcm, dir;
snd_pcm_uframes_t frames = 32;
FILE *file = fopen("001.wav", "wb");
if (!file) {
perror("Unable to create audio file");
return 1;
}
// Open PCM device
if ((pcm = snd_pcm_open(&pcm_handle, device, SND_PCM_STREAM_CAPTURE, 0)) < 0) {
fprintf(stderr, "Unable to open PCM device %s: %s\n", device, snd_strerror(pcm));
fclose(file);
return 1;
}
// Set hardware parameters
snd_pcm_hw_params_alloca(¶ms);
snd_pcm_hw_params_any(pcm_handle, params);
snd_pcm_hw_params_set_access(pcm_handle, params, SND_PCM_ACCESS_RW_INTERLEAVED);
snd_pcm_hw_params_set_format(pcm_handle, params, SND_PCM_FORMAT_S16_LE);
snd_pcm_hw_params_set_channels(pcm_handle, params, channels); // Use the variable channels
snd_pcm_hw_params_set_rate_near(pcm_handle, params, &sample_rate, &dir); // Use the variable sample_rate
// Apply parameters
if ((pcm = snd_pcm_hw_params(pcm_handle, params)) < 0) {
fprintf(stderr, "Unable to set hardware parameters: %s\n", snd_strerror(pcm));
snd_pcm_close(pcm_handle);
fclose(file);
return 1;
}
// Get buffer size
snd_pcm_hw_params_get_period_size(params, &frames, &dir);
int buffer_size = frames * channels * 2; // 2 bytes per channel
char *buffer = (char *)malloc(buffer_size);
// Write WAV file header
fwrite("RIFF", 1, 4, file);
fwrite("----", 1, 4, file); // Placeholder
fwrite("WAVE", 1, 4, file);
fwrite("fmt ", 1, 4, file);
int subchunk1_size = 16;
short audio_format = 1;
fwrite(&subchunk1_size, 4, 1, file);
fwrite(&audio_format, 2, 1, file);
fwrite(&channels, 2, 1, file); // Use the variable channels
fwrite(&sample_rate, 4, 1, file); // Use the variable sample_rate
int byte_rate = sample_rate * channels * 2;
fwrite(&byte_rate, 4, 1, file);
short block_align = channels * 2;
fwrite(&block_align, 2, 1, file);
short bits_per_sample = 16;
fwrite(&bits_per_sample, 2, 1, file);
// Write WAV data header
fwrite("data", 1, 4, file);
fwrite("----", 1, 4, file); // Placeholder
printf("Starting recording...\n");
// Start recording
int total_data_size = 0;
while (1) {
pcm = snd_pcm_readi(pcm_handle, buffer, frames);
if (pcm == -EPIPE) {
snd_pcm_prepare(pcm_handle);
} else if (pcm < 0) {
fprintf(stderr, "Recording failed: %s\n", snd_strerror(pcm));
break;
}
fwrite(buffer, 1, buffer_size, file);
total_data_size += buffer_size;
}
// Update WAV file size
fseek(file, 4, SEEK_SET);
int file_size = total_data_size + 36;
fwrite(&file_size, 4, 1, file);
fseek(file, 40, SEEK_SET);
fwrite(&total_data_size, 4, 1, file);
// Clean up resources
free(buffer);
snd_pcm_drain(pcm_handle);
snd_pcm_close(pcm_handle);
fclose(file);
printf("Recording complete\n");
return 0;
}
gcc audio_record.c -o audio_record -lasound
./audio_record
Install the PyAudio library:
sudo apt update
sudo apt install python3-pip
sudo apt install portaudio19-dev
pip3 install pyaudio
create audio_record.py
import wave
import pyaudio

# Audio format parameters
FORMAT = pyaudio.paInt16  # 16-bit PCM
CHANNELS = 2
RATE = 48000  # Sample rate
CHUNK = 4096  # Buffer size

# Create a PyAudio object
p = pyaudio.PyAudio()

# Open an audio stream
stream = p.open(format=FORMAT,
               channels=CHANNELS,
               rate=RATE,
               input=True,
               frames_per_buffer=CHUNK)

# Open a WAV file for writing
wf = wave.open('001.wav', 'wb')
wf.setnchannels(CHANNELS)
wf.setsampwidth(p.get_sample_size(FORMAT))
wf.setframerate(RATE)

print("Recording...")

# Record audio data
try:
   while True:
      data = stream.read(CHUNK)
      wf.writeframes(data)
except KeyboardInterrupt:
   print("Recording stopped.")

# Clean up
print("Recording complete. Saved as 001.wav")
stream.stop_stream()
stream.close()
p.terminate()
wf.close()
python audio_record.py
LINE 使用
# 配置LINE通路打开
amixer -c 0 cset name='OUT1 Switch' on
使用第一个声卡的第一个设备播放001.wav文件。
- Cmd
- C
- Python
aplay -D hw:0,0 001.wav
• -D hw:0,0 指定了播放设备,hw:0,0 是card 0 device 0,也就是第一个声卡的第一个设备。
• 001.wav 指定了音频文件,wav表示文件格式,001表示文件名。
Install the ALSA library and its development headers:
sudo apt update
sudo apt install libasound2-dev
create audio_play.c
#include <stdio.h>
#include <stdlib.h>
#include <alsa/asoundlib.h>
int main(int argc, char *argv[]) {
const char *device = "hw:0,0"; // Set audio device
const char *filename = "001.wav"; // Audio file path
snd_pcm_t *pcm_handle;
snd_pcm_hw_params_t *params;
unsigned int sample_rate = 44100; // Sample rate
int pcm, dir;
snd_pcm_uframes_t frames;
FILE *file;
char *buffer;
int buffer_size;
// Open audio file
file = fopen(filename, "rb");
if (!file) {
perror("Unable to open audio file");
return 1;
}
// Open PCM device
if ((pcm = snd_pcm_open(&pcm_handle, device, SND_PCM_STREAM_PLAYBACK, 0)) < 0) {
fprintf(stderr, "Unable to open PCM device %s: %s\n", device, snd_strerror(pcm));
fclose(file);
return 1;
}
// Set hardware parameters
snd_pcm_hw_params_alloca(¶ms);
snd_pcm_hw_params_any(pcm_handle, params);
snd_pcm_hw_params_set_access(pcm_handle, params, SND_PCM_ACCESS_RW_INTERLEAVED);
snd_pcm_hw_params_set_format(pcm_handle, params, SND_PCM_FORMAT_S16_LE);
snd_pcm_hw_params_set_channels(pcm_handle, params, 2);
snd_pcm_hw_params_set_rate_near(pcm_handle, params, &sample_rate, &dir);
// Apply parameters
if ((pcm = snd_pcm_hw_params(pcm_handle, params)) < 0) {
fprintf(stderr, "Unable to set hardware parameters: %s\n", snd_strerror(pcm));
snd_pcm_close(pcm_handle);
fclose(file);
return 1;
}
// Get frame size and buffer size
snd_pcm_hw_params_get_period_size(params, &frames, &dir);
buffer_size = frames * 4; // 2 channels, each sample is 2 bytes
buffer = (char *) malloc(buffer_size);
// Play audio
while (fread(buffer, 1, buffer_size, file) > 0) {
if ((pcm = snd_pcm_writei(pcm_handle, buffer, frames)) == -EPIPE) {
snd_pcm_prepare(pcm_handle);
} else if (pcm < 0) {
fprintf(stderr, "Playback failed: %s\n", snd_strerror(pcm));
}
}
// Cleanup
free(buffer);
snd_pcm_drain(pcm_handle);
snd_pcm_close(pcm_handle);
fclose(file);
printf("Playback completed\n");
return 0;
}
gcc audio_play.c -o audio_play -lasound
./audio_play
Install the PyAudio and wave libraries:
sudo apt update
sudo apt install python3-pyaudio
create audio_play.py
import pyaudio
import wave

def play_audio(filename):
   # Open WAV audio file
   with wave.open(filename, 'rb') as wf:
      # Initialize PyAudio
      p = pyaudio.PyAudio()

      # Configure audio stream
      stream = p.open(format=p.get_format_from_width(wf.getsampwidth()),
                        channels=wf.getnchannels(),
                        rate=wf.getframerate(),
                        output=True)

      # Read and play audio data
      data = wf.readframes(1024)
      while data:
            stream.write(data)
            data = wf.readframes(1024)

      # Stop and close audio stream
      stream.stop_stream()
      stream.close()

      # Terminate PyAudio
      p.terminate()
      print("Playback completed")

# Play file
play_audio('001.wav')
python3 audio_play.py
HDMI/DP 说明
xrandx命令可以查看当前HDMI连接:
neardi@3588:~$ xrandr
Screen 0: minimum 320 x 200, current 1920 x 1080, maximum 16384 x 16384
HDMI-1 connected primary 1920x1080+0+0 (normal left inverted right x axis y axis) 0mm x 0mm
   1920x1080     60.00*+  60.00    50.00    30.00    24.00
   4096x2160     24.00
   3840x2160     30.00    25.00    24.00
   1920x1080i    60.00    50.00
   1280x720      60.00    60.00    50.00    50.00    30.00    24.00
   720x576       50.00    50.00
   720x480       59.94    59.94    59.94
HDMI-2 disconnected (normal left inverted right x axis y axis)
DSI-1 connected 1920x1080+0+0 (normal left inverted right x axis y axis) 0mm x 0mm
   1920x1080     60.00*+
DP-1 disconnected (normal left inverted right x axis y axis)
完整节点:
HDMI1:/sys/devices/platform/display-subsystem/drm/card0/card0-HDMI-A-1/
HDMI2:/sys/devices/platform/display-subsystem/drm/card0/card0-HDMI-A-2/
HDMI3:/sys/devices/platform/display-subsystem/drm/card0/card0-DSI-1/
DP:/sys/devices/platform/display-subsystem/drm/card0/card0-DP-2/
HDMIIN Usage
HDMI input is an interface that can receive external HDMI signals and convert them into MIPI signals. The LPA3588 provides one HDMI input. Before using the HDMI input, ensure that the HDMI device is correctly connected and the resolution and frame rate settings are consistent.
Refer to 《HDMIIN》
ETH 说明
可以通过调试串口、ssh或者adb来查看IP地址,例如:
neardi@3588:~$ ifconfig -a
enP2p33s0: flags=4163<UP,BROADCAST,RUNNING,MULTICAST>  mtu 1500
        inet 192.168.1.65  netmask 255.255.255.0  broadcast 192.168.1.255
        inet6 fe80::7df7:e74d:497e:345d  prefixlen 64  scopeid 0x20<link>
        ether 62:ea:fb:ca:95:e7  txqueuelen 1000  (Ethernet)
        RX packets 2548  bytes 210938 (210.9 KB)
        RX errors 0  dropped 0  overruns 0  frame 0
        TX packets 338  bytes 46899 (46.8 KB)
        TX errors 0  dropped 0 overruns 0  carrier 0  collisions 0
        device interrupt 140  base 0xd000
Wi-Fi 说明
通过如下命令查看当前Wi-Fi型号:
cat /sys/bus/sdio/devices/mmc2\:0001\:1/vendor
cat /sys/bus/sdio/devices/mmc2\:0001\:1/device
0x02d0:0xaae8:AP6275S.0x024c:0xb852:RTL8852.0x024c:0xd723:RTL8723DS.0x024c:0xc821:RTL8821CS.0x1ffe:0x6316:FD7352S。
连接 Wi-Fi:
-
Cmd
-
C
-
Search Wi-Fi:
sudo nmcli device wifi rescan
- Show all Wi-Fi:
nmcli dev wifi list
- Connect Wi-Fi:
sudo nmcli device wifi connect neardi_5G password neardi_pwd
• neardi_5G 是WiFi 网络(SSID) 的名称。
• neardi_pwd 是连接到该WiFi 网络所需的密码。
• sudo 用于确保nmcli 具有管理网络连接所需的权限,因为在某些系统上连接到WiFi 网络可能需要管理权限。
create connect_wifi.c
#include <stdio.h>
#include <stdlib.h>
#include <string.h>
#include <unistd.h>

void connect_to_wifi(const char *ssid, const char *password) {
   char command[256];

   // Create the WPA configuration file without the -e option
   snprintf(command, sizeof(command), "echo 'network={\\n  ssid=\"%s\"\\n  psk=\"%s\"\\n}' | sudo tee /etc/wpa_supplicant/wpa_supplicant.conf", ssid, password);
   if (system(command) != 0) {
      perror("Failed to create wpa_supplicant.conf");
      return;
   }

   // Run wpa_supplicant
   if (system("sudo wpa_supplicant -B -i wlan0 -c /etc/wpa_supplicant/wpa_supplicant.conf") != 0) {
      perror("Failed to start wpa_supplicant");
      return;
   }

   // Obtain an IP address
   if (system("sudo dhclient wlan0") != 0) {
      perror("Failed to obtain an IP address");
   }
}

int main() {
   const char *ssid = "neardi_5G";
   const char *password = "neardi_pwd";

   connect_to_wifi(ssid, password);
   return 0;
}
gcc connect_wifi.c -o connect_wifi
sudo ./connect_wifi
Sata硬盘和SSD的使用
- 插入Sata硬盘,打开终端,输入
sudo fdisk -l命令查找USB驱动器的设备名称,一般为/dev/sda1或/dev/sdb1等。 - 使用
sudo mkdir /backup命令创建一个新目录。 - 输入
sudo mount /dev/sda1 /backup命令(假设挂载点为/backup)挂载Sata硬盘分区。
TF卡使用
1.查看已连接设备
lsblk 命令可以列出系统中的所有块设备,包括硬盘、SSD、USB 驱动器、TF 卡等。
输出示例:
neardi@LPA3588:~$ lsblk
NAME         MAJ:MIN RM   SIZE RO TYPE MOUNTPOINT
mmcblk0      179:0    0 115.2G  0 disk
├─mmcblk0p1  179:1    0     1M  0 part
├─mmcblk0p2  179:2    0     4M  0 part
├─mmcblk0p3  179:3    0     4M  0 part
├─mmcblk0p4  179:4    0    64M  0 part
├─mmcblk0p5  179:5    0   128M  0 part
├─mmcblk0p6  179:6    0    32M  0 part
└─mmcblk0p7  179:7    0   115G  0 part /
mmcblk0boot0 179:32   0     4M  1 disk
mmcblk0boot1 179:64   0     4M  1 disk
mmcblk1      179:96   0  58.6G  0 disk
├─mmcblk1p1  179:97   0     4M  0 part
├─mmcblk1p2  179:98   0     4M  0 part
├─mmcblk1p3  179:99   0    64M  0 part
├─mmcblk1p4  179:100  0   128M  0 part
├─mmcblk1p5  179:101  0    32M  0 part
└─mmcblk1p6  179:102  0  58.4G  0 part /media/neardi/47a3b5be-53bd-4d96-b3d0-e095c4879f34
默认挂载在/media/neardi/,如果你想挂载在其他地方,请按照以下说明操作:
//umount
sudo umount /media/neardi
//mount
sudo mount /dev/mmcblk0p1 /mnt/tfcard
如果权限不足,执行 sudo chown -R neardi:neardi /media/neardi.
RTC时钟
LPC3588使用HYM8563作为RTC时钟。
如何修改RTC时钟为'2025-11-11 12:00:00'
- Cmd
- C
 #关闭网络时间协议(NTP)的服务,使得RTC时钟不受网络时间的影响
 timedatectl set-ntp false
 #设置RTC时钟的时间为2025年11月11日12时00分00秒
timedatectl set-time '2025-11-11 12:00:00'
 #将RTC时钟的时间同步到系统时钟,使得系统时钟和RTC时钟保持一致,可加在/etc/init.d/rockchip.sh中
 hwclock --hctosys
create time_setter.c
#include <stdio.h>
#include <stdlib.h>
#include <string.h>
#include <time.h>
#include <unistd.h>

void exec_command(const char *cmd) {
    int ret = system(cmd);
    if (ret != 0) {
        fprintf(stderr, "Command failed: %s\n", cmd);
        exit(1);
    }
}

// Set system time
void set_system_time(const char *time_str) {
    char cmd[128];
    snprintf(cmd, sizeof(cmd), "timedatectl set-time '%s'", time_str);
    exec_command(cmd);
}

// Disable NTP
void disable_ntp() {
    exec_command("timedatectl set-ntp false");
}

// Synchronize hardware clock to system clock
void sync_hwclock_to_system() {
    exec_command("hwclock --hctosys");
}

// Print help information
void print_usage() {
    printf("Usage: time_setter -t <time>\n");
    printf("  -t <time>   Set system time (format: 'YYYY-MM-DD HH:MM:SS')\n");
    printf("  -h          Show help\n");
}

int main(int argc, char *argv[]) {
    if (argc != 3) {
        print_usage();
        return 1;
    }

    const char *time_str = NULL;

    int opt;
    while ((opt = getopt(argc, argv, "t:h")) != -1) {
        switch (opt) {
            case 't':
                time_str = optarg;
                break;
            case 'h':
            default:
                print_usage();
                return 0;
        }
    }

    if (time_str == NULL) {
        fprintf(stderr, "Error: Time argument is required\n");
        print_usage();
        return 1;
    }

    // 1. Disable NTP
    disable_ntp();

    // 2. Set system time
    set_system_time(time_str);

    // 3. Synchronize hardware clock to system clock
    sync_hwclock_to_system();

    printf("Time has been set to: %s\n", time_str);
    return 0;
}
gcc -o time_setter time_setter.c
./time_setter -t "2025-11-11 12:00:00"
指示灯
- Power 电源指示灯,常亮表示设备已通电且电源正常供电。
- SYS 系统状态灯,正常运行时周期性闪烁,表示系统主控正常运行。
- STA 状态指示灯,可用于反映系统工作状态、应用层心跳,正常时闪烁。
- 4G 灯,行为由所用拨号模块(如 Quectel EC20)定义,例如:
- 常亮:已注册网络
- 闪烁:正在拨号或数据传输中
- 熄灭:无信号或模块未初始化